Your Cart is Empty

, ,
Compatible with car:
, ,
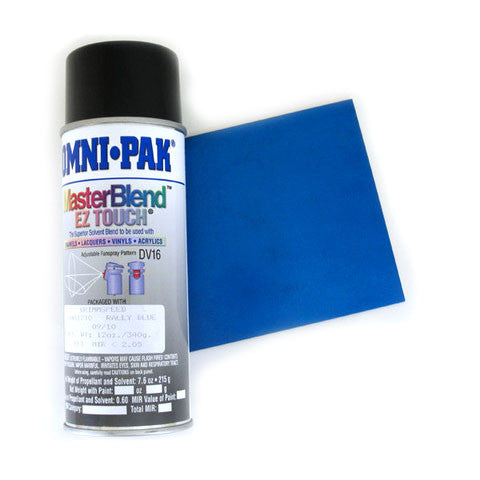
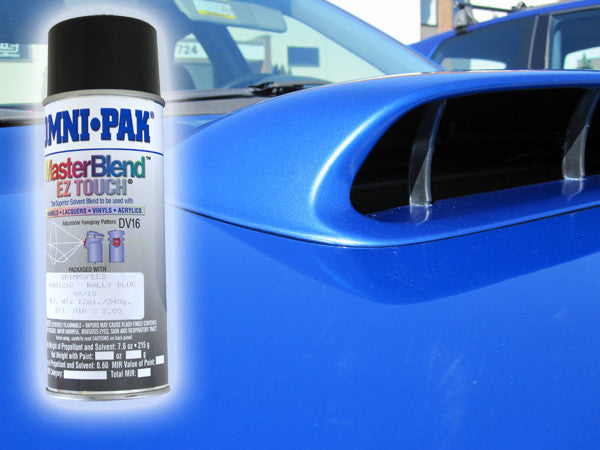
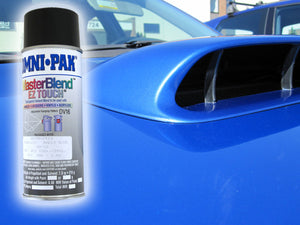
Finally an answer to all of the World Rally Blue owners out there. We came up with a perfect paint match to World Rally Blue (WRB) in a convenient spray-can! Now you can paint match your side-skirts, hood scoops, bumpers, mirrors, you name it!
Clear coats and application
We suggest the blue color coats to happen within an hour of each other. We recommend using clear coat 3-4 days AFTER the coats of the blue to prevent the occurrence of lifting and/or wrinkling. Any clear should work but we suggest testing a sample area first. A clear coat is necessary for a complete and finished look.
One can of GrimmSpeed "Rally Blue" will thoroughly coat one hood scoop. Allow 2-3 cans for side-skirts, or more depending on applications.
12 ounce can.
NOTE: Paint can only be shipped in the lower 48 states and cannot be shipped by air, which means no express services. Please select a Ground Shipping option only!
SKU#: 08648WR
Shipping Weight: 3.0 lb
Supplier: GrimmSpeed
Category: Accessories, GrimmSpeed, Other Accessories
For years I’ve been wanting and needing better brakes. The stock brakes on the 2014 WRX was never the best. I was hesitant about upgrading to the 4 pot 2 pot 2006-07 conversion for a while because I wanted to car to remain mostly stock as possible. These brakes not only perform better, but also required no cutting or modification to any bolts or clamps. It bolted right on. My car now looks better, stops better, and remains looking stock at the same time. Subaru should include adding these as an option out the gate. I little more bite would not hurt, but overall I’m am completely satisfied.
For years I’ve been wanting and needing better brakes. The stock brakes on the 2014 WRX was never the best. I was hesitant about upgrading to the 4 pot 2 pot 2006-07 conversion for a while because I wanted to car to remain mostly stock as possible. These brakes not only perform better, but also required no cutting or modification to any bolts or clamps. It bolted right on. My car now looks better, stops better, and remains looking stock at the same time. Subaru should include adding these as an option out the gate. I little more bite would not hurt, but overall I’m am completely satisfied.
For years I’ve been wanting and needing better brakes. The stock brakes on the 2014 WRX was never the best. I was hesitant about upgrading to the 4 pot 2 pot 2006-07 conversion for a while because I wanted to car to remain mostly stock as possible. These brakes not only perform better, but also required no cutting or modification to any bolts or clamps. It bolted right on. My car now looks better, stops better, and remains looking stock at the same time. Subaru should include adding these as an option out the gate. I little more bite would not hurt, but overall I’m am completely satisfied.
For years I’ve been wanting and needing better brakes. The stock brakes on the 2014 WRX was never the best. I was hesitant about upgrading to the 4 pot 2 pot 2006-07 conversion for a while because I wanted to car to remain mostly stock as possible. These brakes not only perform better, but also required no cutting or modification to any bolts or clamps. It bolted right on. My car now looks better, stops better, and remains looking stock at the same time. Subaru should include adding these as an option out the gate. I little more bite would not hurt, but overall I’m am completely satisfied.
For years I’ve been wanting and needing better brakes. The stock brakes on the 2014 WRX was never the best. I was hesitant about upgrading to the 4 pot 2 pot 2006-07 conversion for a while because I wanted to car to remain mostly stock as possible. These brakes not only perform better, but also required no cutting or modification to any bolts or clamps. It bolted right on. My car now looks better, stops better, and remains looking stock at the same time. Subaru should include adding these as an option out the gate. I little more bite would not hurt, but overall I’m am completely satisfied.
For years I’ve been wanting and needing better brakes. The stock brakes on the 2014 WRX was never the best. I was hesitant about upgrading to the 4 pot 2 pot 2006-07 conversion for a while because I wanted to car to remain mostly stock as possible. These brakes not only perform better, but also required no cutting or modification to any bolts or clamps. It bolted right on. My car now looks better, stops better, and remains looking stock at the same time. Subaru should include adding these as an option out the gate. I little more bite would not hurt, but overall I’m am completely satisfied.
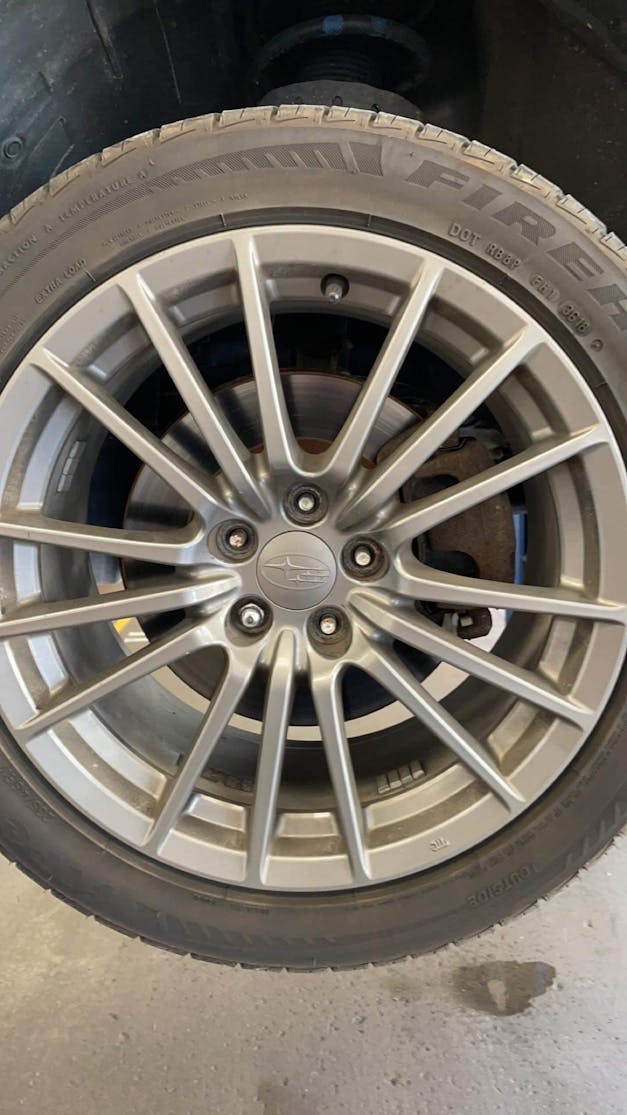
More of a 4.5 star rating, as I wish the kit came with copper washers for the brake line, banjo bolts. Not a big deal, but it was just bad timing when EVERY parts shop in the city(Winnipeg, Manitoba CAN) was sold out of them for whatever reason. In any case, install was incredibly easy. The only difficult task was grinding some excess metal casting from the rear wheel knuckles, so that the adapter bracket would fit. Make sure you have a decent metal file, or grinding wheel. Brakes feel a bit better than the OEM 2009 WRX sliding, 4POT front, 1POT rear, but you make more up in the aesthetic looks. I'm using the calipers with 17in Sparco Assetto Gara wheels, and they fit perfect.
More of a 4.5 star rating, as I wish the kit came with copper washers for the brake line, banjo bolts. Not a big deal, but it was just bad timing when EVERY parts shop in the city(Winnipeg, Manitoba CAN) was sold out of them for whatever reason. In any case, install was incredibly easy. The only difficult task was grinding some excess metal casting from the rear wheel knuckles, so that the adapter bracket would fit. Make sure you have a decent metal file, or grinding wheel. Brakes feel a bit better than the OEM 2009 WRX sliding, 4POT front, 1POT rear, but you make more up in the aesthetic looks. I'm using the calipers with 17in Sparco Assetto Gara wheels, and they fit perfect.
More of a 4.5 star rating, as I wish the kit came with copper washers for the brake line, banjo bolts. Not a big deal, but it was just bad timing when EVERY parts shop in the city(Winnipeg, Manitoba CAN) was sold out of them for whatever reason. In any case, install was incredibly easy. The only difficult task was grinding some excess metal casting from the rear wheel knuckles, so that the adapter bracket would fit. Make sure you have a decent metal file, or grinding wheel. Brakes feel a bit better than the OEM 2009 WRX sliding, 4POT front, 1POT rear, but you make more up in the aesthetic looks. I'm using the calipers with 17in Sparco Assetto Gara wheels, and they fit perfect.
These brakes look and feel amazing and are relatively easy to install. Make sure you follow the Subaru pattern for brake bleeding, FR RL FL RR. That being said, a two thousand dollar brake kit should come with copper washer replacements for the banjo bolts, especially since you’re going to need 8 of them. You can probably get away with reusing them, but at this point, why cut corners? SEND THE DAMN COPPER WASHERS WITH THE KIT. Fast wrx was easy to work with and parts arrived quickly, would recommend.
These brakes look and feel amazing and are relatively easy to install. Make sure you follow the Subaru pattern for brake bleeding, FR RL FL RR. That being said, a two thousand dollar brake kit should come with copper washer replacements for the banjo bolts, especially since you’re going to need 8 of them. You can probably get away with reusing them, but at this point, why cut corners? SEND THE DAMN COPPER WASHERS WITH THE KIT. Fast wrx was easy to work with and parts arrived quickly, would recommend.
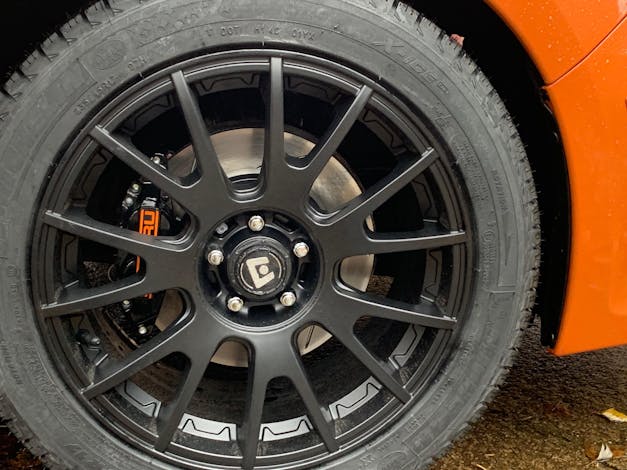
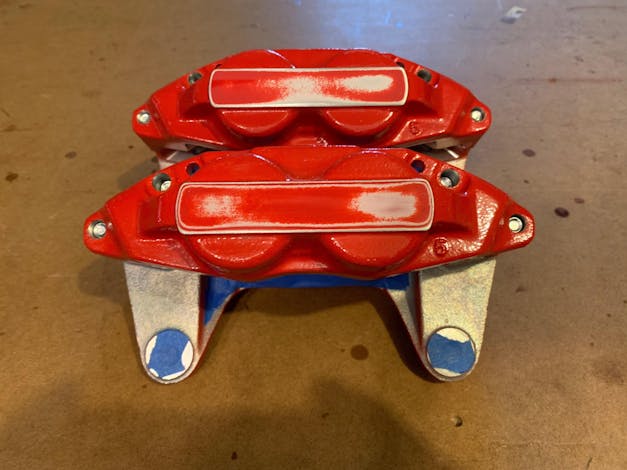
After having both rear calipers replaced (under extended warranty,) I decided to make a pro-active change to the front calipers. The standard red color of the 2006/7 4-pot calipers was less than ideal for the WRX SE, which is a bright orange with black accents. So I decided to paint them black and, depending on how the decals came out, re-apply the Subaru logo in either white or orange. I used a caliper enamel paint with an activated hardener (the G2 brake caliper paint kit.) Couple of notes on that kit--the finish required multiple layers to fully coat and cover the underlying red, but the kit basically tells you to dump the entire bottle of activator into the paint can. If you do that, you won't be able to let the enamel dry/harden between coats. Also, the brush included is not very good, it started losing bristles with the first coat, depositing them along with the paint onto the calipers. I bought a $5 set of brushes of various shapes and sizes from Walmart that were much, much better and allowed me to do the detailed areas much easier. Finally, the mixing ratio of the hardener to paint may not be quite right. I used a syringe to measure out both the paint and activator, in the proscribed 8:1 ratio, and had to wait a full day for the enamel to fully cure. This might also have been because of the relatively low temperature in my garage, though. Even though the photos might look like the finish is rough, it did end up coming out quite nice. I think the lighting from above in the photos causes a lot of specular reflection that makes the finish look more uneven than it really is. The decals were produced by www.undergroundgrfx.com I had my mechanic install, along with new StopTech rotors, new wheels, and winter tires, exactly one day before our first snowfall :) So, I can't say exactly how easy the install was, other than that they only charged me for 2 hrs of their time.
After having both rear calipers replaced (under extended warranty,) I decided to make a pro-active change to the front calipers. The standard red color of the 2006/7 4-pot calipers was less than ideal for the WRX SE, which is a bright orange with black accents. So I decided to paint them black and, depending on how the decals came out, re-apply the Subaru logo in either white or orange. I used a caliper enamel paint with an activated hardener (the G2 brake caliper paint kit.) Couple of notes on that kit--the finish required multiple layers to fully coat and cover the underlying red, but the kit basically tells you to dump the entire bottle of activator into the paint can. If you do that, you won't be able to let the enamel dry/harden between coats. Also, the brush included is not very good, it started losing bristles with the first coat, depositing them along with the paint onto the calipers. I bought a $5 set of brushes of various shapes and sizes from Walmart that were much, much better and allowed me to do the detailed areas much easier. Finally, the mixing ratio of the hardener to paint may not be quite right. I used a syringe to measure out both the paint and activator, in the proscribed 8:1 ratio, and had to wait a full day for the enamel to fully cure. This might also have been because of the relatively low temperature in my garage, though. Even though the photos might look like the finish is rough, it did end up coming out quite nice. I think the lighting from above in the photos causes a lot of specular reflection that makes the finish look more uneven than it really is. The decals were produced by www.undergroundgrfx.com I had my mechanic install, along with new StopTech rotors, new wheels, and winter tires, exactly one day before our first snowfall :) So, I can't say exactly how easy the install was, other than that they only charged me for 2 hrs of their time.
After having both rear calipers replaced (under extended warranty,) I decided to make a pro-active change to the front calipers. The standard red color of the 2006/7 4-pot calipers was less than ideal for the WRX SE, which is a bright orange with black accents. So I decided to paint them black and, depending on how the decals came out, re-apply the Subaru logo in either white or orange. I used a caliper enamel paint with an activated hardener (the G2 brake caliper paint kit.) Couple of notes on that kit--the finish required multiple layers to fully coat and cover the underlying red, but the kit basically tells you to dump the entire bottle of activator into the paint can. If you do that, you won't be able to let the enamel dry/harden between coats. Also, the brush included is not very good, it started losing bristles with the first coat, depositing them along with the paint onto the calipers. I bought a $5 set of brushes of various shapes and sizes from Walmart that were much, much better and allowed me to do the detailed areas much easier. Finally, the mixing ratio of the hardener to paint may not be quite right. I used a syringe to measure out both the paint and activator, in the proscribed 8:1 ratio, and had to wait a full day for the enamel to fully cure. This might also have been because of the relatively low temperature in my garage, though. Even though the photos might look like the finish is rough, it did end up coming out quite nice. I think the lighting from above in the photos causes a lot of specular reflection that makes the finish look more uneven than it really is. The decals were produced by www.undergroundgrfx.com I had my mechanic install, along with new StopTech rotors, new wheels, and winter tires, exactly one day before our first snowfall :) So, I can't say exactly how easy the install was, other than that they only charged me for 2 hrs of their time.
After having both rear calipers replaced (under extended warranty,) I decided to make a pro-active change to the front calipers. The standard red color of the 2006/7 4-pot calipers was less than ideal for the WRX SE, which is a bright orange with black accents. So I decided to paint them black and, depending on how the decals came out, re-apply the Subaru logo in either white or orange. I used a caliper enamel paint with an activated hardener (the G2 brake caliper paint kit.) Couple of notes on that kit--the finish required multiple layers to fully coat and cover the underlying red, but the kit basically tells you to dump the entire bottle of activator into the paint can. If you do that, you won't be able to let the enamel dry/harden between coats. Also, the brush included is not very good, it started losing bristles with the first coat, depositing them along with the paint onto the calipers. I bought a $5 set of brushes of various shapes and sizes from Walmart that were much, much better and allowed me to do the detailed areas much easier. Finally, the mixing ratio of the hardener to paint may not be quite right. I used a syringe to measure out both the paint and activator, in the proscribed 8:1 ratio, and had to wait a full day for the enamel to fully cure. This might also have been because of the relatively low temperature in my garage, though. Even though the photos might look like the finish is rough, it did end up coming out quite nice. I think the lighting from above in the photos causes a lot of specular reflection that makes the finish look more uneven than it really is. The decals were produced by www.undergroundgrfx.com I had my mechanic install, along with new StopTech rotors, new wheels, and winter tires, exactly one day before our first snowfall :) So, I can't say exactly how easy the install was, other than that they only charged me for 2 hrs of their time.
After having both rear calipers replaced (under extended warranty,) I decided to make a pro-active change to the front calipers. The standard red color of the 2006/7 4-pot calipers was less than ideal for the WRX SE, which is a bright orange with black accents. So I decided to paint them black and, depending on how the decals came out, re-apply the Subaru logo in either white or orange. I used a caliper enamel paint with an activated hardener (the G2 brake caliper paint kit.) Couple of notes on that kit--the finish required multiple layers to fully coat and cover the underlying red, but the kit basically tells you to dump the entire bottle of activator into the paint can. If you do that, you won't be able to let the enamel dry/harden between coats. Also, the brush included is not very good, it started losing bristles with the first coat, depositing them along with the paint onto the calipers. I bought a $5 set of brushes of various shapes and sizes from Walmart that were much, much better and allowed me to do the detailed areas much easier. Finally, the mixing ratio of the hardener to paint may not be quite right. I used a syringe to measure out both the paint and activator, in the proscribed 8:1 ratio, and had to wait a full day for the enamel to fully cure. This might also have been because of the relatively low temperature in my garage, though. Even though the photos might look like the finish is rough, it did end up coming out quite nice. I think the lighting from above in the photos causes a lot of specular reflection that makes the finish look more uneven than it really is. The decals were produced by www.undergroundgrfx.com I had my mechanic install, along with new StopTech rotors, new wheels, and winter tires, exactly one day before our first snowfall :) So, I can't say exactly how easy the install was, other than that they only charged me for 2 hrs of their time.